DigitalOcean App Platform and Database Migrations
Software engineer @ Metosin Ltd Need help with a project, contact: first.last@metosin.com As a 𝐜𝐨𝐧𝐬𝐮𝐥𝐭𝐚𝐧𝐭, I help clients find technical solutions to their business problems and facilitate communication between the stakeholders and the technical team. As a 𝐟𝐮𝐥𝐥-𝐬𝐭𝐚𝐜𝐤 𝐝𝐞𝐯𝐞𝐥𝐨𝐩𝐞𝐫, I build technical solutions for client's problems from user interfaces, and backend services to infrastructure-as-code solutions. As a 𝐦𝐚𝐜𝐡𝐢𝐧𝐞 𝐥𝐞𝐚𝐫𝐧𝐢𝐧𝐠 𝐞𝐧𝐠𝐢𝐧𝐞𝐞𝐫, I create, validate and deploy predictive models.
This time, we'll continue working on the application from the previous posts by configuring PostgreSQL database migrations. We are not going to go into data modeling just yet. Instead, we are making sure that everything is ready for the time we're going to start working on the data schemas. By the end of all of this, we should have a deployed API that can fetch the content of the migrations table from the DigitalOcean apps development database.
This is the third post on a series building on DigitalOcean. Read the previous posts in the series to catch up on the context if you haven't done so already.
So, without further ado, let's get to the topic and configure Migratus for running the database migrations.
Configure Migrations
To use Migratus, first, we must add the dependency to our deps.edn file and get the latest version from Clojars. I also like to create an alias into the file to have a command line invocation to generate the migration files that we can later use with clj -X:create-migration <migration-name>.
{:paths ["src" "resources"]

 :deps {...
        migratus/migratus {:mvn/version "1.5.4"}}

 :aliases {...
           :create-migration
           {:exec-args {:name nil}
            :exec-fn main/create-migration}}}
The next step is to run the migrations on application startup. Let's do this by updating the main.clj by first requiring migratus, creating a configuration and the create-migration-function configured for the create-migration alias.
(ns main
  (:require [ring.adapter.jetty :as jetty]
            [migratus.core :as migratus] ;; Add migratus
            [next.jdbc :as jdbc])
  (:gen-class))

(defn get-port []
  (Integer/parseInt (System/getenv "PORT")))

(defn get-db-conf []
  {:dbtype  "postgres"
   :jdbcUrl (System/getenv "JDBC_DATABASE_URL")})

;; THIS IS NEW ;;;;;;;;;;;;;;;;;;;;;;;;;;;;;;

(defn migrations-config []
  {:db                   (get-db-conf)
   :store                :database
   :migration-dir        "migrations/"
   :migration-table-name "migrations"
   :init-in-transaction? false})

(defn create-migration [{:keys [name]}]
  (migratus.core/create (migrations-config)
                        name))

;;;;;;;;;;;;;;;;;;;;;;;;;;;;;;;;;;;;;;;;;;;;;

(defn datasource []
  (jdbc/get-datasource (get-db-conf)))

(defn app [_request]
  (let [migrations (jdbc/execute! (datasource)
                                  ;; Get migrations instead of version
                                  ["SELECT * FROM migrations"])]
    {:status  200
     :headers {"Content-Type" "application/edn"}
     :body    (str migrations)}))

(defn -main [& _args]
  ;; Run migrations everytime the application starts!
  (migratus/migrate (migrations-config))
  (jetty/run-jetty #'app {:port (get-port)}))
We create a test migration with the alias we created in the first step.
❯ clj -X:create-migration :name test
❯ tree resources
resources
└── migrations
   ├── 20231208151434-test.down.sql
   └── 20231208151434-test.up.sql
And that's it for the configuration. If you're going to add PostgreSQL schemas in your test migration, note that if you use multiple SQL statements, you need to separate each of them with --;;.
Test the Migrations Locally
Now that we have the application updated and migrations configured, let's validate that everything works as expected (If you haven't already tested all of this in the REPL). But before that, let's create another Dockerfile for the development build and add the PostgreSQL package to have it available in the DigitalOcean application console. This will allow us to connect to the development database from DigitalOcean with a command-line interface.
FROM clojure:openjdk-17-tools-deps-alpine

RUN apk update; apk add postgresql

WORKDIR app
COPY . .
RUN clojure -P
CMD clojure -X:run
And next, update the docker-compose.yml to use the development Dockerfile.
services:

  api:
    build:
      context: .
      dockerfile: docker/dev.Dockerfile # <-- use the new file
After executing docker-compose up --build we should have the updated application running in a container with the database. Use another terminal window from the same directory to test that we can use the psql client from within our application container.
❯ docker-compose run api psql -h postgres -U user -d db
The password is defined in the docker-compose.yml's JDBC_DATABASE_URL. Now that we have successfully connected to the database, let's see if we have the expected table migrations listed with \dt and that we have the expected test migration applied.
db=# \dt
          List of relations
 Schema |    Name    | Type  | Owner
--------+------------+-------+-------
 public | migrations | table | user
(1 row)

db=# select * from migrations;
       id       |        applied         | description
----------------+------------------------+-------------
 20231208151434 | 2023-12-09 08:29:05.82 | test
(1 row)
It's looking good. As a last step, let's try to retrieve the same content via the HTTP API.
❯ http :8000
HTTP/1.1 200 OK
Content-Type: application/edn
Date: Sat, 09 Dec 2023 08:33:08 GMT
Server: Jetty(9.2.21.v20170120)
Transfer-Encoding: chunked

[{:migrations/id 20231208151434,
  :migrations/applied #inst "2023-12-09T08:29:05.820000000-00:00",
  :migrations/description "test"}]
Everything is working as expected. Let's see how we can follow the same steps on the deployed application.
Deploy the Changes to DigitalOcean
Before deploying the changes, we need to update the applications run_command since the Alpine image doesn't have rlwrap installed.
@@ -41,7 +41,7 @@ resource "digitalocean_app" "app" {
       source_dir = "api/"
       http_port  = 8000

-      run_command = "clj -X:run"
+      run_command = "clojure -X:run"
     }

     database {
First, push the image to your DigitalOcean Container Registry (DOCR) and wait for the deployment to finish. You can find the instructions for the deployment from the previous posts. Refer to the first post on how to set up the DigitalOcean project and push images to the DigitalOcean Container Registry and the second post to update the application to read the environment variables dynamically.
Now that the changes are deployed, we can visit our DigitalOcean dashboard and find the application console. This provides access similar to what we did earlier with the docker-compose exec ..., which is why we installed the Postgres client in the image itself. I wanted to show that it is possible to connect to the database for debugging, maintenance, or whatever reasons when using the application platform.
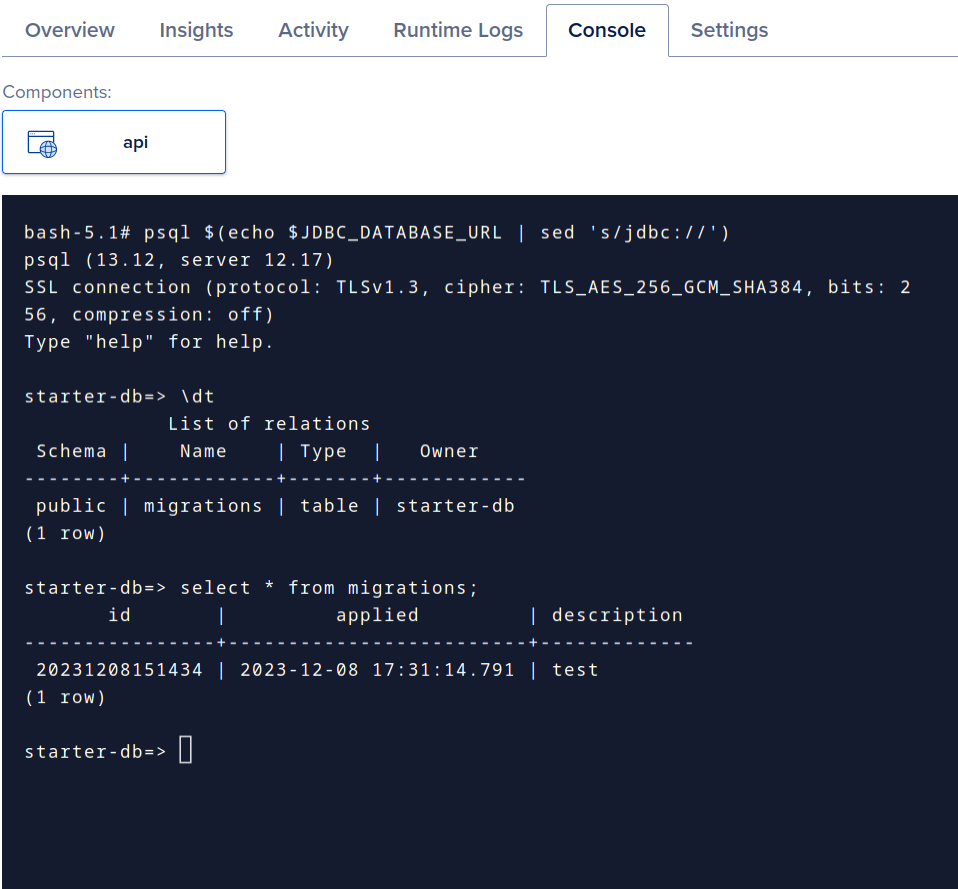
Finally, as a last step, let's call the endpoint to see how the API returns the migrations table data.
❯ http https://sample-app-mffks.ondigitalocean.app
HTTP/1.1 200 OK
CF-Cache-Status: MISS
CF-RAY: 8326da43ccded93f-HEL
Connection: keep-alive
Content-Type: application/edn
Date: Fri, 08 Dec 2023 17:50:46 GMT
Last-Modified: Fri, 08 Dec 2023 17:50:46 GMT
Server: cloudflare
Set-Cookie: __cf_bm=eZ9Xa2czsbrF7O71GudfKdryjh.VD8bBKAG5EcXof88-1702057846-0-Ack9rJbWGn1PH2yEzcqHNxJjqfzvEX2n8nWJybWQpIaP63X/LFMEaTMazT1dEjpfdcVYFd30zmZCkZ78wART9yM=; path=/; expires=Fri, 08-Dec-23 18:20:46 GMT; domain=.ondigitalocean.app; HttpOnly; Secure; SameSite=None
Transfer-Encoding: chunked
Vary: Accept-Encoding
cache-control: private
x-do-app-origin: 1a36f444-619d-4979-9436-c8765b32e6f6
x-do-orig-status: 200

[{:migrations/id 20231208151434,
  :migrations/applied #inst "2023-12-08T17:46:28.392000000-00:00",
  :migrations/description "test"}]
It works!
Conclusion
To run migrations, you can just run them on the application startup. Migratus is an excellent lightweight option for Clojure. Set up the migration files, create the configuration, and you're ready.
To my knowledge, the DigitalOcean app platform doesn't provide a direct way to connect to the development database from the command line. Still, we can use the app console as a bastion if we've installed psql in the container image. Even if you haven't installed it, you can do that in the console, but you'd need to do this again after each deployment.
Thank you for reading. I hope you found this helpful.
Feel free to reach out and let me know what you think—social links in the menu.